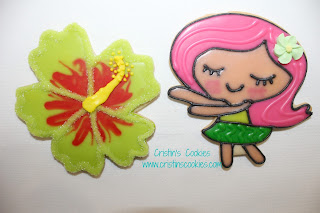
One of my cookie cutter customers asked if I would make her a special hibiscus flower cookie cutter and she sent me a picture. I get custom cutter requests all the time, but for some reason, this one seemed really fun to me. So I made her a hibiscus cookie cutter and shipped it out and then I made myself one too :-) So thank you Blanca. I had a wonderful time making these cookies. And I decided to make a hula girl to go with the hibiscus and I named her Blanca.
Here are my hibiscus flower cookies.
I started by making the hibiscus flower cookie cutter - available in my Etsy shop here
I outlined the design and let that set for just a short bit
then I flooded the cookie
While it was still wet, I made a center design. You can do this any number of ways. I decided to go with a pattern, but you could just put dots in the center and pull them with a toothpick or whatever works for you.
I filled the center section - careful to not get too too much icing or it will run over the sides of your cookie
While the bottom layer and the top pattern were both still wet, I used a toothpick and pulled little bits throughout the flower
Then I let that cookie dry several hours (or overnight) and then I outlined the cookie again adding middle detail around each petal and since the rest of the cookie was dry, I was able to add sanding sugar to the outlined flower to make the detail stand out. Then I added the center part of the flower in yellow.
and I added the detail to that center yellow part. Sorry I know nothing about flowers and what the actual names are.
I was really happy with how they came out.
Then I decided to add in the little hula girl to go with my hibiscus flowers. I started by making the cookie cutter. Blanca the Hula Girl is available in my Etsy shop here.
Then I outlined the design of my hula girl. While her hair was wet after filling that section, I added a pretty royal icing flower to her hair. I bought the cute royal icing flowers from Carol at DecorationDreamz4U Etsy shop. I've tried to make my own icing flowers, but it is just not in my ability, so I'm very thankful for Carol's selection in her Etsy shop.
After I flooded the different areas of the cookie, I let it dry overnight. The next morning, I added some details to her hair, the hula skirt and added luster dust to her cheeks.
Pretty fun huh!
Thank you also to customer Bethany, who came up with a really cool idea of printing out and laminating my tutorials and making cards for the cookie cutters. She showed me this super cool photo of gifts that she's given out of my cookie cutters and/or that she has saved with the tutorial.
So I've included an optional tutorial card to the listing for these Hawaiian theme cookies. You can use the laminated tutorial card as a guide or you can put it into your Kopykake projector too. Save it with your cookie cutter for design ideas when you make your cookies.
and then I made some fun matching cookie tags and made some available for YOU to use too! You can download your own Hawaiian cookie tags here.
My little granddaughter is just over a year old now, but you can see from this picture just how long I've been wanting to make hibiscus cookies! ;-)
I had 5 extra cookies last week, so I posted on Facebook that the next 5 cookie cutter orders that had 3 or more cookie cutters in their order (big enough box to hold a scrumptious cookie with the order) would receive one of my hula girl cookies. One of the orders was for Christine who was kind enough to share this picture of her gorgeous daughter with the hula girl cookie. I squealed when I saw this! Laney you are such a cutie patootie!
Thanks for the fun hibiscus flower idea Blanca! I can't wait to see your cookies too!
Hawaiian blog background for today:


The hula girl cookie cutter was a great idea! I am invited every year to a Hawaiian luau party. This and the hibiscus would be great for me to bring to the party next year. They are both beautiful cookies. The laminated card will be really helpful.
ReplyDeletePreciosas!!! excelente trabajo!
ReplyDelete